 Supplies
glass jars
tissue paper
mod podge
black spray paint
Halloween face template (found here)
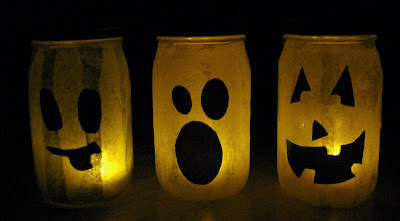
You can find the detailed tutorial here, but it's pretty simple. Cut your tissue paper into strips, apply mod podge to the jar, attach the strips, then attach the faces.
You can be pretty creative with these. I didn't have any orange paper for the traditional pumpkin look, so we used green, white and yellow for a more monster/ghost/creature theme. I just printed the faces off on regular white paper and regular black printer ink, but once the mod podge was applied they looked pretty good. I chose to spray paint the lids black for the finishing touch, but you could do green for pumpkins, or add some ribbon or tulle.
Don't forget the candles for the finishing touch! (Actually, I bought a cheap pack of the little tea-lights that you can turn on and off, so I don't have to worry about flames and little people).
 Here are a few other seasonal Halloween activities I plan to try this year:
Monsters! Monster shapes from Little Page Turners
Bottle Cap Spiders from Silly Eagle Books
Building a Skeleton from Chasing Cheerios
Marshmallow Ghost from No Time for Flashcards
Festive Silhouettes from Serving Pink Lemonade
Here is a link to the fun Halloween projects we did last year.
As is our habit, we're reading books!


2 comments on "Glowing Faces in a Jar (and other Halloween Fun)"
SO cute. I love these!
When I saw the title of the post I thought it read "Growing Faces in a Jar"! I thought that would be appropriate for Halloween as well, but not quite kid appropriate.
Post a Comment